Showing posts with label crafts. Show all posts

Friday, March 28, 2014

Bliss & Bows


In my spare time (I actually do have some, even with 3 kids, believe it or not!) I make hair accessories and bow-ties for babies and children.  

Last fall, I opened my new shop, Bliss & Bows, on Facebook.  It has been such a stress-reliever to create fun, adorable accessories for little boys and girls.  I started out by just making hairbows, but was quickly asked to supply some bow-ties for the fellas.  

Let me know what you think and please, check out my Facebook page.  The items are listed with their prices, if they are still available.  If there is something you like, but would prefer in a different color or mounted differently, let me know!  I can also do custom orders if you see something you like - and I have even made wedding garters on request.

Here are just a few of some of my creations.  Enjoy!

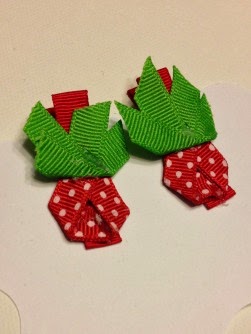
Sweet Strawberry clips

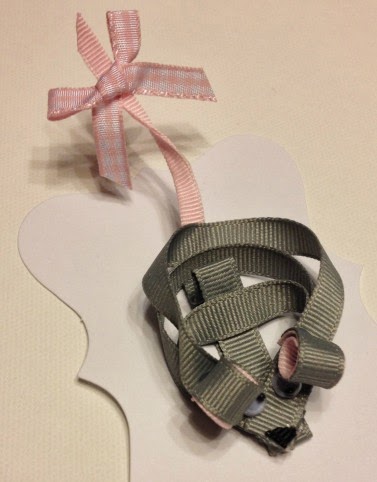
Mice are not the only ribbon sculptures I can do!

A pink crown clip is just right for a little princess

This beautiful piece was recently sold :)

A fun, Cupcake Pony-O

Girly grey and aqua headband

Safari Minnie Mouse headband

Satin, peacock-inspired headband

Show some patriotic spirit

a playful headband

Simple Easter Egg bow

Aqua Satin flower with rhinestone and pearl center

Wednesday, March 19, 2014

{365} Challenge: Frozen Movie Night


Yesterday was the DVD release of Disney's Frozen, to the delight of Disney fans everywhere.  My kids had no idea that I pre-ordered it months ago and have been eagerly awaiting its arrival in the mail.  If you have not yet ordered it, you can get it here.

Because of Baby B, we never made it to the theater to watch this new classic, so I made this movie release into a fun, themed, dinner night.

To start things off, I wanted to set the mood with the proper decor.  I found some light blue tablecloths at the dollar store to hang as bunting in our dining room.  To add to the look, I added some glittery flower-shaped bunting that kind of resembled snowflakes that I had in my party supplies.  Glitter was everywhere.


I also found some cute printables to slip into a few frames over at Paging SuperMom.


I set up the table for the boy's return from school with snacks to start the afternoon and evening off.  I even found a cute board book for Baby B.  I thought about picking up some of the figurines or dolls, but since Baby B is so young and the boys don't care about dolls - I passed on this.


I found some cute carrot "eggs" from the dollar store that I filled with some carrot-shaped chocolates.  


For drinks I put out blue Gatorade with carrot straws I also found at the dollar store.


Just like at a restaurant, I provided the boys with some table entertainment by printing out some Frozen mazes I found at Mom Endeavors.  She has a lot of great Frozen printables on her page, but my boys are old enough that the coloring pages don't catch their interest much anymore. 


For dinner I served "Troll Stone" Sandwiches (the sandwiches being a reference to the song "Love is an Open Door" and "Forest Trees."


Even Baby B joined in with dinner with some of the asparagus.  We are doing Baby-led Weaning .  I do not think she cared for asparagus.


To top it all off, for dessert I made cake pop snowmen.  This was messy to make, but fun and tasty.


I am sure most of you know how to make cake pops by now (there are tutorials all over the internet), but just in case, here is a quick run-down of how I made these.

First, bake a cake according to package directions.  After it is done and cooled, crumble it and mix it with a tub of cake frosting.  For the snowmen I did a white cake with vanilla frosting.


Form the cake mixture into balls.  I made 4 sets in three sizes to form the snowmen.  There was still a lot left over so I scooped a bunch more with a cookie scoop to make "snowballs."  Then place in the freezer on a cookie sheet for a few hours until hardened.


Once they are frozen, melt some chocolate coating (I used Bright White Candy Melts) and dip the cake balls into the melted chocolate.  Keep the cake balls that you are not working with in the freezer.  If they start to thaw, they will just fall apart in the melted chocolate.

Here is the important part to make the snowmen: as you place the cake balls on a wax-paper lined tray to set, sprinkle them with shredded coconut.  This is also the time to build your snowmen.  I found out the hard way that this is very difficult to do once the chocolate has set.  I used the cake pop sticks (cut short) to keep the three cake balls in line with each other.

For the carrot noses, I sliced up a baby carrot.  Then I took a meat thermometer (it has a sharp end) and poked holes where the nose goes and then inserted the carrot sliver.  I used frosting for the eyes.  Had I not waited for the chocolate to set, I could have inserted pretzel arms into the bodies, but I didn't want to chance breaking the snowmen by doing it after the chocolate had set.  Even armless, I still think they are cute.


After dinner we settled in for the movie.  Everyone enjoyed it and my husband was laughing loudly most of the movie.  This is definitely a Disney classic!

What is your favorite scene from Disney's Frozen?
Are you planning a Frozen movie night?  If so, what are your plans?  Share your links if you blog!


Post Comment Love

Tuesday, March 18, 2014

Card Table Makeover

This last weekend was my lucky weekend!  Maybe it was the St. Patrick's Day magic in the air, but more than likely it was God placing me in just the right positions to score big.

Not only did I score the FREE BOB jogging stroller, on Sunday morning while messing around on Facebook, another deal popped up.  Are you familiar with any of the yard sale sites on Facebook these days?  I love them!  I have been able to sell a bunch of stuff to set  money aside for our Walt Disney World trip.  As I was looking at one of the sites I am on, a local lady posted that she was giving away some junky card tables for free.  I am in a Bunco group and we often have parties or yard sales where extra tables come in handy so I NEEDED these tables.  I hopped in the jeep and hurried over.  Thankfully, I was the first to arrive and took both of the card tables.  They actually were not in bad shape and I knew immediately that these would be great makeover stories.


To do this you will want:
a card table (duh)
1 1/2 yards fabric
1 1/2 yards 4 gauge clear vinyl
staple gun with short staples (I used 1/4")
screwdriver
scissors

Start to finish (if I do not include being interrupted by mommyhood) was under 2 hours.  Almost everything I needed I already had at home.  The only thing I felt I should get was 4 gauge vinyl, to protect the top and make it "waterproof."  JoAnne's sells this for $2.99/yard and I used a 40% off coupon for the yard and a half I purchased. So for $2.70 was all I spent on this project.

My husband took the top off the first table before I took a picture, but the top only had a few snags in it.  First thing was to remove the top which was really easy.  Just locate the screws and remember to place them in a safe spot so you can reattach the top later.


You may want to wipe down the frame and pull off any tape that is stuck on it.  Mine had duct tape on two of the legs from holding down a tablecloth at some point.  After it is clean enough for you, spray paint it.  I prefer the spray paint that does a double coat since it requires less work.  I chose a light pink that I had on hand.


While that dries, lay out your fabric.  I had this amazing pink tattoo flash print that I have been holding on to for YEARS that I decided to use.  Trim it to fit, leaving a good inch all the way around.  Now you will staple it to the underside of the table.  I folded mine under so it looked nicer.  Of course, I forgot to take a picture of this step.  After that is done, repeat this procedure with the clear vinyl.


That is basically it!  Now you just reattach the top to the (dried) frame and you are good to go!


I just love how my table turned out!  It suits me perfectly.

Tuesday, March 11, 2014

Earth Day Festival 4/26

Every year I look forward to attending our city's Earth Day festival.  This event is FREE and has tons of vendors doing giveaways and showing people how to conserve resources.  Reptiles and other critters are on display, crafts and games are out for the kids, shows go on all day, and you can also bring books to trade for other books.  

Pack your family, pack the sunscreen and head on out to this event.  I highly encourage you to ride a bike or walk if you live close enough.  Parking can be insane!  See you there!

You can get more information on the event here.


Thursday, March 6, 2014

{365} Challenge: Organize the Cords


Today's Challenge: Organize the Cords

A few years ago I went to the Alameda Antique Faire (amazing!) with a friend and found this great little vintage luggage piece.  I didn't know what to use it for at the time, but it eventually became a great spot for storing the cords we use for our electronics.  However, this little box has become a nest that any bird would be grateful to lay an egg in.


Saturday's are baseball days which means that I need the phone and camcorder charged to capture the moments and I do not have spare time to hunt down the chargers.  It was time to tackle this task.

In all honesty, this took less than 10 minutes, which makes it worse that I have put it off.  I grabbed some plastic baggies and labeled them with what the cords belong to.  Then I neatly stacked them in the box, with the extension cord that we use most often on top.  


I actually feel better having accomplished this menial task.


You can catch up on my challenges here.


Wednesday, February 26, 2014

DIY: Lucky Letters

I don't know why, but I love St. Patrick's Day.  Something about all of the bright greens, rainbows, and green beer makes me happy, I suppose.  I decided that this year I would create something fun for my home for this holiday that typically lacks in decorations.


Materials:
Paper mache letters
Rust-Oleum gold glitter spray paint
green & gold glitter combo
self-adhesive spray
clear coating spray (Hairspray also works)


Isn't this gorgeous?!  I bought it to add a little base shimmer on my letters.  You don't need it, but I figure with spray this pretty, I could use it again for Fourth of July or Christmas.  Note: The spray isn't a solid glitter like on the cap - it is a spray to make things sparkle.


First I sprayed the letters with the Rust-Oleum spray.  Notice the sparkle?  Trust me, it was there haha!

After the letters dried, I sprayed them, one at a time, with self-adhesive spray and then coated them liberally with the glitter.  This took a few applications to get all of the visible sides covered.  I decided not to glitter the backs since they will not be seen.

After they were glittered and dried (boy was that a fun mess!) I sprayed them with the clear coating to keep the glitter from flaking off everywhere.

This WILL happen.  Embrace it.

I think they look beautiful!  I am going to add some more green to my mantle to complete the look.


Don't you just love my empty frame?  My rotten cat jumped up there a few weeks ago and knocked it down, breaking the mirror inside.  Yes, he still lives, but he is on my naughty list.